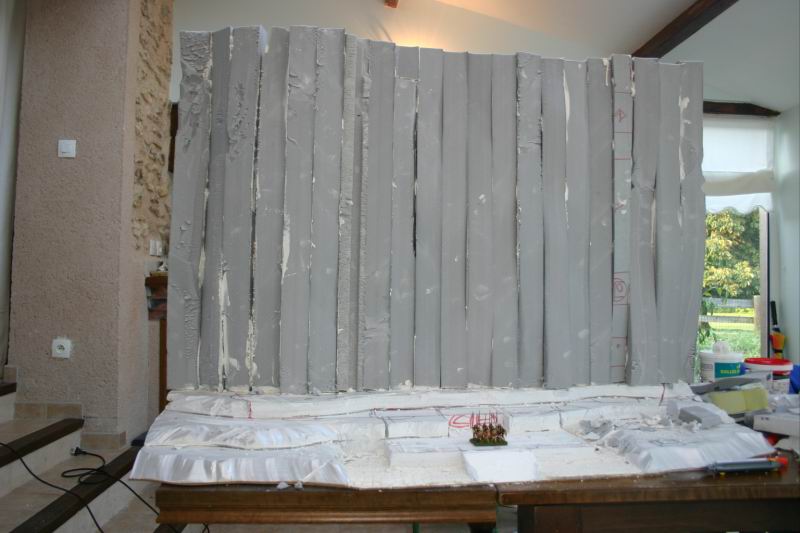
The basic structure of the cliff. If the base is
made of horizontal strates like many scenery pieces, the cliff itself
is made of vertical bands. I was first thinking about using a big plate
instead of the plates. A first experience proved that even if sculpting
a simple plate, the cliff would be too much "regular" so I changed
my mind and took that option.

A side view of the basic structure. I ve used a little plate of cheap wood to give some rigidity, and extruded polystyrene for the ground and cliff.

Another view of the basic structure. Extruded polystyrene,
while a bit expensive compared to normal polystyrene (especially when
u can find free normal polystyrene plates) have some great advantages
: it do not make little bubbles, and can be easilly sculpted. Also it
s a lot more resistant.

After a little jump in time. The walls are made in
foamcore. For the lower part, i ve used plaster and the stones have been
sculpted in plaster before putting them in place. To be sure that the
plaster would be resistant, I ve not only used plaster and water but also
a bit of PVA glue. While waiting for the plaster to dry, a research on
the net let me learn of filling paste. I bought a few and tested it. It
appeared that I could used it once the foamcore structure would be in
place. So i forgot the plaster walls.

For the crenels I did cast (plaster + pva + water)
in a low cylinder. Then i did cut them in the center to have 2 stasis
rune shaped crenels. I did it several time. Here you can also see that
all the stasis rune shaped canon holes were made before doing the stone
texture.

A view of the entrance with 25 mm spartans from Wargames
Foundry to show scale.

I then started to add details as i was finding them
like the copper tubes that were waiting in a box for a few years. I also
added the entrance fortification were the jolanti should take place.

Detail of some of the tubes which have just been
glued in place with PVA glue.

Detail of the canon holes. The copper plates that
are used as doors are normally used in boat modelism. They ve been glued
with cyanoacrylic glue. You can see that the inside of the mine have been
painted black. This have been done before gluing the foamcore plates together.

Detail of the entrance fortification with miniatures
to give an idea of the size. The dwarves are from Westwind, the lunar
is from Ral Partha. The dwarves are more heavy than those of many other
ranges and are qualified as 32 mm by some peoples. I personnally think
that they just are good to simulate iron dwarves. They ve been made for
war and it s just normal that they re bigger than other mostali.

A general front view of the Mine. Many crenels are
still missing (they ve been casted during the project duration as a parallel
task. When the mine was drying, i was casting them and so on.

The main door. I ve put a little black wash to show
the details. It s made with foamcore plates glued together. The crown
have only 3 "crenels" to remind a mastery rune. The mouth and
eyes are stasis runes. The repetition of the stasis rune in as many details
as possible (canon holes, runes, door, crenels, etc.) was there to give
a strong identity to the mine. All the rivets are in fact dots of pva
glue.

A combination of Man and Stasis rune to make a Mostali
rune. It have just been drawn and then cut from a plate of foamcore. Dots
of PVA glue simulate rivets without having to make them.

A general view of the entrance with the door and
the 2 mostali runes. It s still missing the crenels.

General view from the left.

Once all the crenels have been put in place, I added
blocks of extruded polystyrene to the cliff to give it more relief, then
i textured the cliff in 2 steps, the first was to just texture the polystyrene
with a knife. Then i did put everything on the ground in my garden and
started to add more texture. For this, i used a mix of filling paste,
plaster, pva glue, water, sand and little blocks of polystyrene.

Then i undercoated everything with a strong black
acrylic paint normally used to paint walls. and started the real painting
job. All the bronze parts have been painted in green. I did get the idea
after visiting the Invalides with friends.

The actual color of the mine is somewhere between
the previous picture (with flash) and this one (long exposure).

Another view of the Mine. The grid "hide"
a big computer fan that is working.

Detail of the upper "courtyard".

Details

Details... the dome on the left is an half of a ball.
I used the other half a long time ago for the roof of the Sun Dome Temple
stronghold of my Sun Domers army.

Detail of the entrance.

Detail of the entrance.

Detail of the entrance.

Next step was to add the canons. They ve all been
casted in resin.

A front view of the close to finished Mine.

and another one.

The jolanti have been made from the same stone as
the cliff behind the mine : extruded polystyrene.

They re basically blocks of polystyrene glued together
with PVA glue and reinforced in the articulations by pieces of metal wire.
This one is still waiting for his hands.
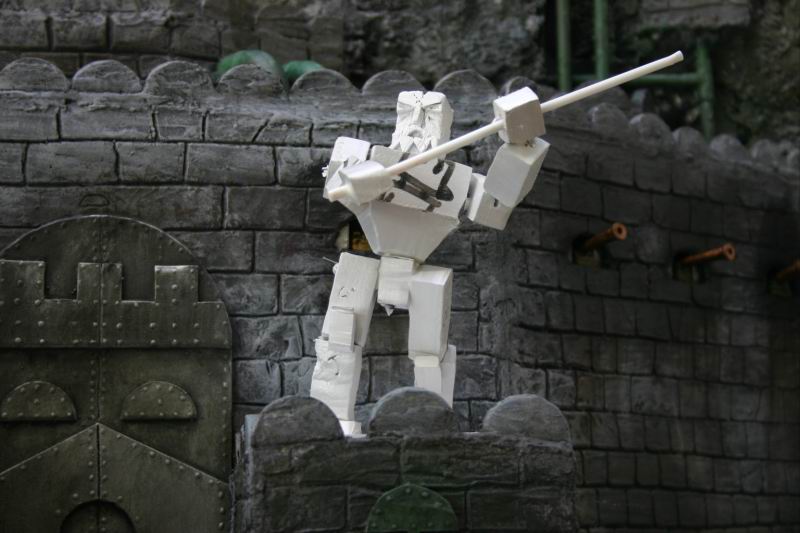
On the standing one you can see the shaft of his
weapon, made with sticks of shuppa chups. The faces have been sculpted
with a scalpel and have the same beard as the one on the door, with a
stasis rune mooth, to link them a bit more to the mine.

Next step was to bring some energy and light to the
mine. I used an old computer alimentation (200 W)...

and a few neons normally used for computer tuning.
You can t see it on the pictures, but they were more pink than red. I
resolved this problem by puting them inside little red plastic bags.

The Mine with light on.

As you can see, i worked a bit on the jolanti, structuring
the polystyrene with a scalpel and then painting them in the same colors
as the mine.

Another view of the Mine.

again...

here you can see the shape of the axes blades...
Stasis again.

The fan is moving...

detail on canon

again

the standing jolanti

and his brother.